Finding a new surf spot is one of surfing’s great rewards: a different wave, a fresh stretch of coastline, and a deeper understanding of how swell, wind, tide, and bottom shape all work together. But showing up blind can waste a session, put you in dangerous conditions, or create tension with locals who know the place well. Good surf spot research helps you choose the right day, bring the right board, understand the risks, and surf with more confidence from the very first paddle out.
Before you hit the road, it helps to have the right tools on hand. A good surf journal is a great place to record spot notes, forecast observations, and session details as you build your knowledge over time. If you plan to scout from the shore or cliff, a pair of compact binoculars can help you read wave behavior, pick out hazards, and assess crowd positioning before you ever paddle out.
Whether you are exploring a new local break or planning a surf trip overseas, the same core research process applies. The goal is to combine multiple sources of information until you have a realistic picture of the wave, the conditions, and the lineup.
Why Researching New Surf Spots Matters
Every surf spot has a personality. Some waves need long-period groundswell to break properly. Others only fire on a small, local windswell. A point break may be perfect on a mid tide but useless at low. A beach break might shift every week as sandbars move. Researching before you go helps you answer the most important question: will this spot suit the conditions, my ability, and my goals today?
Good research also helps you avoid common first-visit mistakes. You can learn where to park, where to paddle out, and which rocks or currents to watch for. You will also understand basic etiquette before you enter the lineup, which matters especially at tight-knit communities, reef breaks, and high-quality point breaks where visitors are closely watched.
Start With the Surf Spot Basics
Before diving into forecasts and charts, build a simple profile of the spot. This gives you a framework for judging whether a forecast is actually good for that particular wave.
Identify the Type of Wave
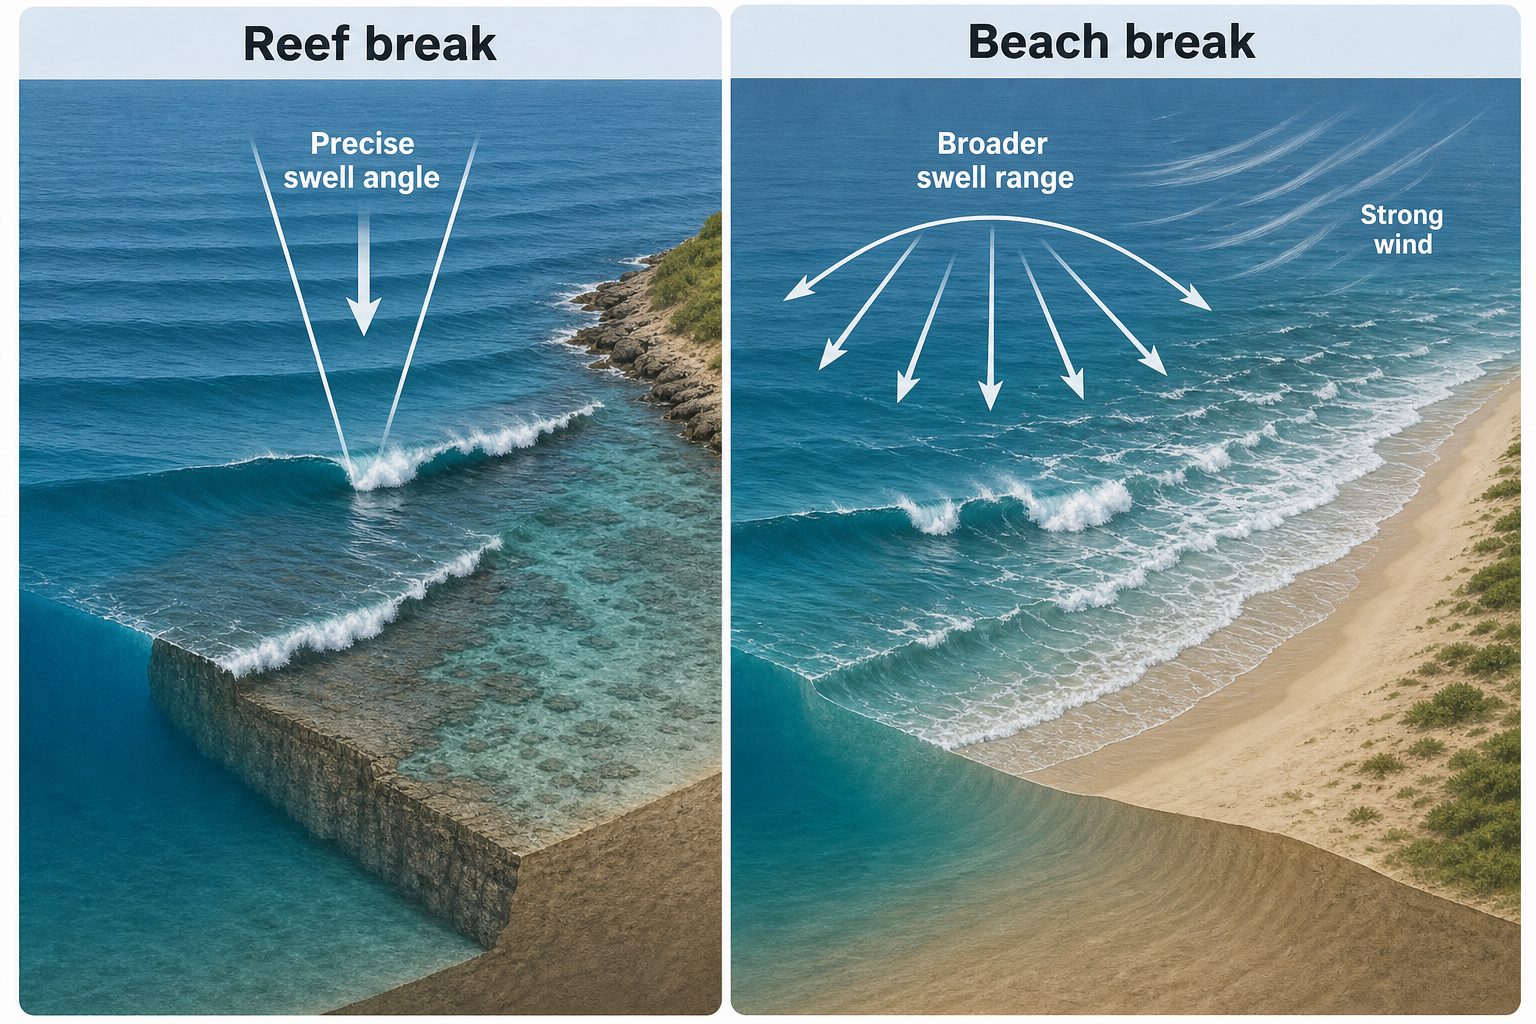
Most surf spots fall into a few broad categories:
- Beach breaks: Waves break over sand, can change frequently, and often have several peaks.
- Point breaks: Waves wrap along a headland or sand point, often producing longer, more predictable rides.
- Reef breaks: Waves break over rock or coral and are often more consistent but less forgiving.
- River mouths: Sand and current can create powerful peaks, especially after rain or storms.
This first step matters because different wave types respond differently to swell direction, tide, and wind. A reef may need a precise swell angle to work properly, while a beach break may handle a wider range of conditions but fall apart in strong wind.
Check the Ideal Conditions
For each new spot, try to find out its ideal setup: best swell direction and size, best wind direction, optimal tide range, and any key hazards or access details. You will rarely get perfect information from one source alone, so the goal is to piece together a realistic picture from several different clues.
Use Surf Guidebooks to Understand a Spot’s Character
Surf guidebooks are still one of the best starting points for researching new spots because they explain the wave in context. A forecast tells you what the ocean is doing today. A good guidebook tells you what a spot generally needs to work.
What to Look for in a Guidebook
When reading a guidebook entry, look beyond the star rating. Pay attention to swell window, wind exposure, tide preference, bottom type, and difficulty level. The most useful entries also describe crowd patterns, access, and the best season to visit.
A spot described as “best on a southwest swell with northeast wind and mid tide” gives you a clear filter. If the forecast shows short-period northeast windswell and strong onshore wind, you already know not to expect much from that wave, regardless of its reputation.
If you are planning a trip abroad, a dedicated surf travel guide can be invaluable. Regional guides often include spot-by-spot breakdowns, local etiquette tips, and seasonal swell patterns that general forecast sites simply do not cover.
Examples of Useful Surf Guide Resources
- The Stormrider Surf Guide by Low Pressure — one of the best-known global surf guide series.
- Surfline spot guides — include condition notes, spot descriptions, cams, and forecast tools.
- Surf-Forecast.com spot pages — useful for quick summaries of swell, wind, tide, and nearby breaks.
- Regional printed guidebooks — often the best source for local nuance in countries with established surf cultures.
Keep in mind that guidebooks can become outdated, particularly for beach breaks where sandbars shift constantly. Use them as a foundation, then verify with current forecasts, surf cams, and recent local knowledge.
Want to go deeper on how ocean conditions actually work? Wave by Wave is a surfer’s guide to forecasting that covers swell generation, ocean behavior, and how to read the sea more intuitively — genuinely useful for anyone who wants to understand what the forecast numbers actually mean.
Research Surf Spots With Maps and Satellite Imagery
Maps are essential tools because they show the physical setup of a coastline. Once you learn to read them, you can often predict why one spot works on a certain swell while another nearby break stays flat or blows out.
Use Google Maps and Satellite View
Google Maps and Google Earth are excellent for researching access, coastline shape, and possible wave zones. Satellite view can reveal headlands, reefs, river mouths, and channels. It can also show parking areas, trails, cliff access points, and nearby facilities.
Pay attention to the direction a beach or reef faces. A west-facing beach will receive west swell more directly than a south-facing cove. A point tucked behind a headland may need a larger or more angled swell to wrap in properly. Small islands, capes, and offshore reefs can all block swell from certain directions.
Use Nautical Charts and Bathymetry
Bathymetry is the shape of the seafloor, and it plays a huge role in wave quality. Swell slows and bends as it moves into shallower water — a process called refraction. Submarine canyons can focus swell energy. Wide continental shelves can reduce power. Reefs and ledges can cause waves to stand up and break suddenly.
If you want to learn how to interpret the symbols and abbreviations on navigational charts, the U.S. Chart No. 1 reference guide covers everything from depth contours to bottom composition markers, making it a handy reference for reading NOAA charts in the field.
Useful chart resources include:
- NOAA nautical charts for the United States coastline.
- Navionics for marine chart viewing across many regions.
- EMODnet Bathymetry for European waters.
- Australian Hydrographic Office charts for Australia.
- LINZ nautical charts for New Zealand.
On a chart, look for depth contours that bend toward the break, reefs that rise sharply, and channels next to the surf zone. A deep channel beside a reef often provides an easier paddle out. A shallow shelf exposed to long-period swell may produce heavier waves than the forecast height alone suggests.
Check Topographic Maps and Access Routes
Topographic maps are useful when a surf spot is reached by walking trails, cliff paths, or remote roads. They can show elevation changes, footpaths, gates, and potential access obstacles. OpenStreetMap is often helpful for informal routes, especially where Google Maps lacks detail.
When heading to a remote or unfamiliar location, a handheld GPS navigator can make it much easier to follow a route with confidence. And if you are working with printed maps, a waterproof map case will keep them legible even in wet or windy conditions.
Access research is not just about convenience. Some coastlines have private land, seasonal closures, protected dune systems, or restricted parking. Knowing this in advance helps you avoid conflicts and protects future access for other surfers.
Use Surf Cams to Verify Real Conditions
Surf cams are one of the fastest ways to check whether your research matches reality. They show current wave size, crowd level, wind effect, and how the tide is influencing the break. They are especially useful for beach breaks, where sandbars and peaks can change from week to week.
How to Read a Surf Cam Accurately
A surf cam can be misleading if you only glance at it for a few seconds. Spend several minutes watching set waves, lulls, paddle-outs, and where the crowd is sitting. Compare the visible wave size with the forecast. If the forecast calls for four feet at twelve seconds but the cam shows weak, broken-up surf, something may be off — wind, tide, or swell direction could all be factors.
Also consider the camera angle. A zoomed-in cam can make waves look bigger than they are, while a wide-angle cam can make them look smaller. Low light, rain, and sun glare can also hide surface texture and make it harder to read conditions accurately.
Examples of Surf Cam Resources
- Surfline — extensive cam coverage across major surf regions worldwide.
- Coastalwatch — particularly useful in Australia.
- Local surf shops and surf schools — sometimes host cams or post daily reports.
- YouTube live cams — useful in popular beach towns.
- Municipal beach cams — often provided by tourism offices or harbor authorities.
If there is no cam at the exact spot, a nearby one can still be useful for confirming swell energy and wind conditions, but use it carefully. A beach just a few miles away may have different wind exposure or swell shadowing from a headland.
Understand Surf Forecasts Before Choosing a New Spot
Surf forecasts are powerful, but they are not perfect. They combine weather models, wave models, buoy data, and local spot algorithms. To use them well, you need to understand the core ingredients.
Swell Height, Period, and Direction
Swell height measures the size of swell in open water and does not always reflect breaking wave height at the beach. A three-foot swell can produce overhead waves at a focused reef, while a larger swell hitting the wrong angle can leave a famous wave looking flat.
Swell period is the time interval between waves. Longer-period swell carries significantly more energy and power. A four-foot swell at sixteen seconds is usually far more impactful than a four-foot swell at eight seconds — the longer-period waves travel farther, feel more organized, and break with more force.
Swell direction tells you where the swell is coming from. This is often the most overlooked factor. A spot may thrive on a west swell but be completely blocked from a northwest swell by a headland. Knowing a spot’s swell window — the range of directions it can receive — is essential for predicting whether a swell will even reach the break.
Wind Direction and Local Wind Effects
Wind dramatically affects wave quality. Offshore wind blows from land toward the sea, grooming the wave face and helping lips pitch cleanly. Onshore wind blows from sea toward land, creating choppy, crumbly conditions. Cross-shore wind can be either workable or messy depending on the break’s orientation.
When researching a new spot, compare the forecast wind direction with the beach orientation. A west-facing beach benefits from an east wind. If the coastline curves, one section of beach may be cleaner than another in the same conditions. Local thermal patterns — sea breezes, overnight land cooling, mountain gaps — can make wind behave differently from regional model forecasts, which is another reason to check multiple sources.
Tide Range and Timing
Tide changes water depth over the bottom and can completely transform a surf spot. A reef that is dangerously shallow at low tide may become perfect at mid tide. A beach break may close out at high tide but form quality peaks as the water drops. A point break may need enough depth to allow swell to wrap properly around the break.
Always check local tide tables rather than relying on a general regional estimate. Tide timing can vary significantly within large bays, estuaries, and island chains, sometimes by an hour or more.
Compare Several Surf Forecast Resources
No single forecast is always right. The best approach is to cross-reference a spot forecast with regional swell data, wind models, and real-time buoy observations. When all sources agree, your confidence in the forecast is much higher. When they disagree, dig a little deeper to understand why.
Useful Surf Forecasting Websites and Apps
- Surfline — spot forecasts, cams, surf reports, and long-range outlooks.
- Surf-Forecast.com — global spot forecasts and simple condition summaries.
- Windy — wind models, wave models, pressure charts, and interactive map layers.
- Windguru — detailed wind, swell, and weather tables popular with surfers and kitesurfers.
- Buoyweather — marine forecasts and offshore swell data.
For most surfers, the best workflow is to use a surf-specific site like Surfline for a quick read, then use a broader tool like Windy to understand the wider weather pattern. This helps you determine whether the forecast is driven by a solid groundswell, a short-lived windswell, or a rapidly changing storm system.
Use Official Marine Weather Sources
Official meteorological agencies provide high-quality data for wind, marine warnings, buoys, and tidal stations. Examples include:
- NOAA and the National Data Buoy Center in the United States.
- Coastal Data Information Program for California wave buoy readings.
- Met Office marine forecasts in the United Kingdom.
- Bureau of Meteorology marine forecasts in Australia.
- PacIOOS ocean observations for Hawaii and the Pacific Islands.
These sources will not tell you whether the sandbars are good, but they provide accurate real-time wind, tide, and buoy data — exactly what you need when a surf forecast looks questionable or contradictory.
Learn to Read Swell Charts and Pressure Charts
Charts help you move beyond “the forecast says it will be good” and toward understanding why it might be good. This is especially valuable when researching a new spot with no cam, limited reports, or an unusual coastline orientation.
Swell Charts
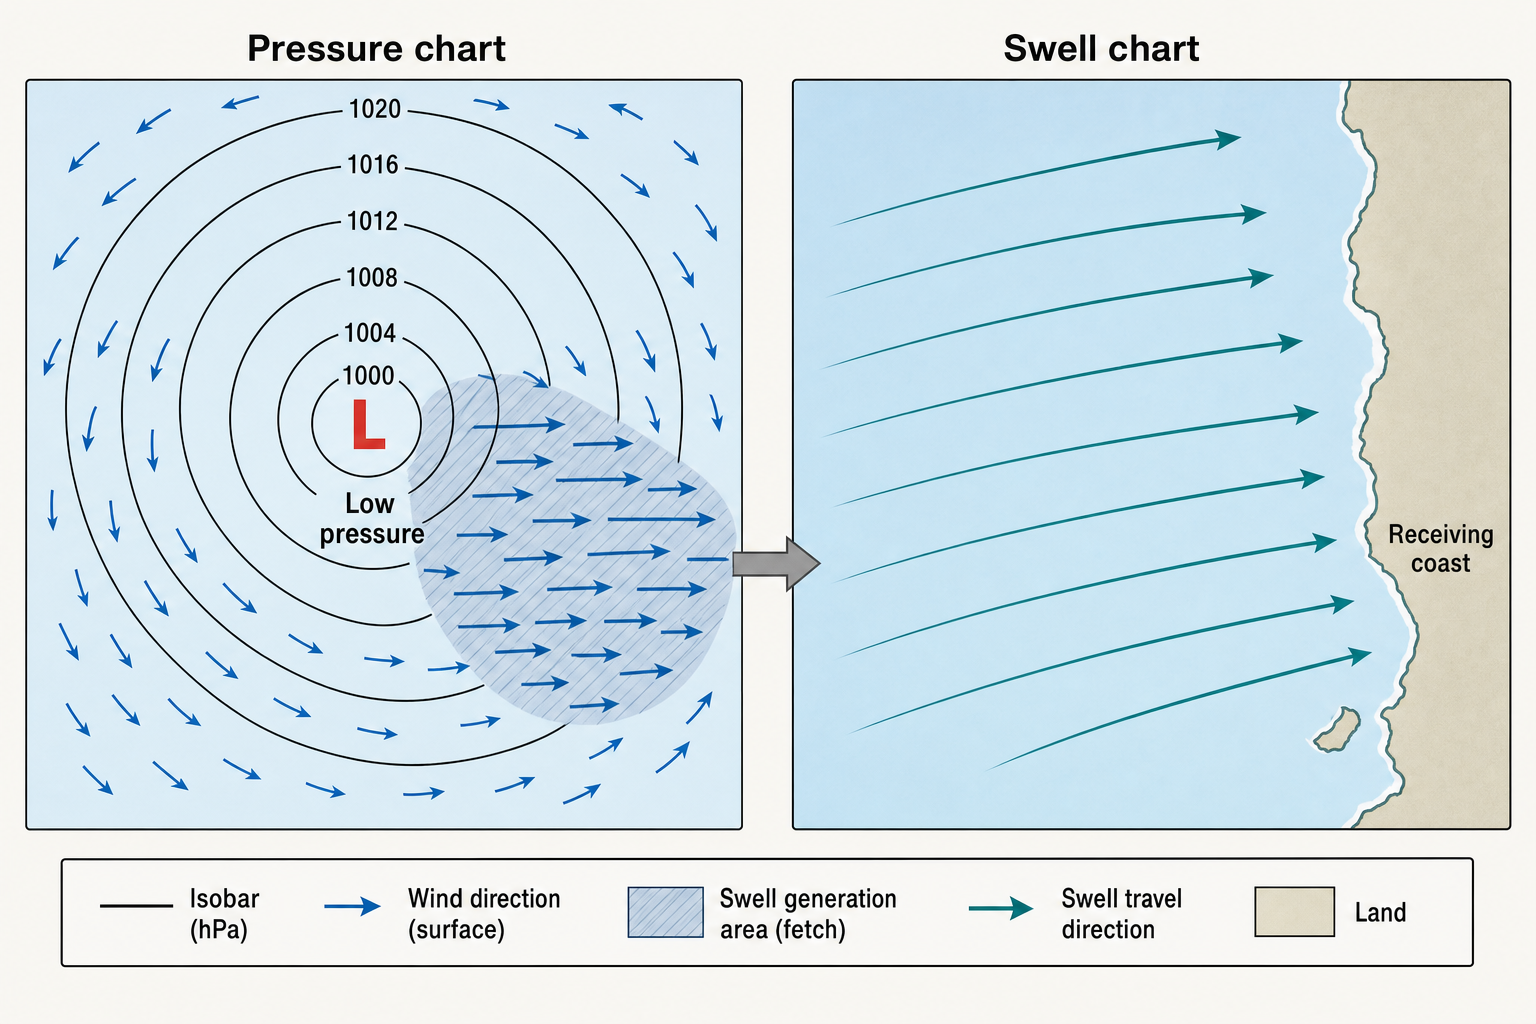
Swell charts show wave energy moving across the ocean, often displaying height, direction, and period over a map. By watching the sequence of charts, you can see when swell will arrive, how long it will last, and which coastlines are most exposed. A long-period southwest swell moving toward southwest-facing reefs is a clear signal. But if a beach is tucked behind an island or peninsula, that same swell may arrive at a reduced size or from a different angle.
Pressure Charts and Storm Position
Surface pressure charts show high- and low-pressure systems along with isobars that indicate wind strength. Closely spaced isobars usually mean stronger winds. Large storms over open ocean create the best groundswell when strong winds blow over a long fetch — the stretch of open water where the swell builds — for enough time. A compact local storm may generate short-period, choppy surf, while a large distant storm can produce clean, long-period swell that arrives after local conditions have settled.
Buoy Readings
Wave buoys measure real ocean conditions and are one of the most reliable tools for confirming whether a swell has actually arrived. They report wave height, swell period, direction, and often water temperature. When choosing a buoy to reference, pick one that is relevant to your surf spot — a buoy on the wrong side of a headland or island may not represent the swell reaching your break at all. If possible, compare an offshore buoy with a nearshore one to see how the swell changes as it approaches the coast.
Evaluate Whether a Surf Spot Matches Your Ability
A wave can be firing and still be completely wrong for where you are in your surfing. Research should always include an honest assessment of difficulty, not just quality. This matters most at reef breaks, heavy beach breaks, remote points, and spots with strong currents or hazardous takeoff zones.
Match the Wave Type to Your Level
Beginners generally progress best at mellow beach breaks with soft shoulders, sandy bottoms, and plenty of room to spread out. Intermediate surfers may look for more defined peaks, smaller reef breaks, or beginner-friendly point breaks. Advanced surfers might target hollow reefs, powerful points, or exposed open-ocean beach breaks.
Spot descriptions often include clues like “experts only,” “shallow at low tide,” “strong rip,” or “long paddle.” Take those warnings seriously. If a spot is known for fast takeoffs and consequences, wait for a smaller, more forgiving day before committing — or find a nearby alternative that better matches your current level.
Consider Board Choice Before You Go
Research also helps you pack the right equipment. A soft beach break with weak windswell might suit a longboard or fish. A powerful reef with steep drops may call for a performance shortboard or step-up. A crowded point with long walls typically rewards a board that paddles well and holds speed through turns.
If you are unsure, bring two boards when you can. For surf travel, research the most typical conditions during your visit window so you are not hauling boards that rarely get used.
Understand Local Etiquette and Surf Culture Before Paddling Out
Researching a new surf spot is not only about conditions. It is also about fitting into the lineup with awareness and respect. Some waves are relaxed and welcoming to visitors. Others are competitive, crowded, or closely tied to local communities where outsiders are not always embraced.
Look for Clues About Crowd Patterns
Guidebooks, cams, forums, and local reports can all give you an idea of when a spot is busiest. Premium points and reefs often pack out quickly on the first good swell after a flat spell. Beach breaks tend to spread the crowd across multiple peaks, which can make them more manageable.
If you are new to a spot, watch before paddling out. Notice where people are sitting, where the sets are breaking, and how surfers rotate through the lineup. At a point break, paddling straight to the top of the queue as a visitor can create real tension. Sitting a little wider, waiting your turn, and giving a few waves away early makes the whole session better for everyone involved.
Use Local Knowledge Carefully
Surf shops, lifeguards, and local surfers can be excellent sources of current information. Ask specific, practical questions — whether a beach is handling today’s swell or whether the tide is due to improve — rather than asking someone to give up their secret spot. A respectful question usually gets a useful answer.
Build a Simple Surf Spot Research Workflow
The easiest way to approach new spots consistently is to follow the same process each time. With practice, it becomes quick and intuitive.
Step 1: List possible spots. Start with a guidebook, forecast map, or regional surf article. Note wave type, ideal swell direction, best tide, and wind exposure for each option.
Step 2: Check the swell window. Look at forecast swell direction, period, and size. Compare with each spot’s exposure — will the swell arrive directly, wrap in, or be blocked by geography?
Step 3: Check wind and tide. Compare wind direction with the beach or reef orientation. Check tide timing and plan your arrival around the optimal window for that spot.
Step 4: Verify with cams and buoys. Use surf cams if available. If not, check nearby cams and relevant buoys to confirm the swell has arrived and conditions are shaping up as expected.
Step 5: Research access and lineup details. Use maps to confirm parking, entry points, trails, and any access restrictions. Check recent comments or local reports if available. If the spot is remote, check road conditions and plan for daylight.
Step 6: Watch before paddling out. Even the best research cannot replace direct observation. Spend at least ten minutes watching the surf. Identify set waves, currents, the main takeoff zone, and the easiest paddle route. If the spot looks different from what you expected, adjust your plan accordingly.
A Practical Example of Researching a New Surf Spot
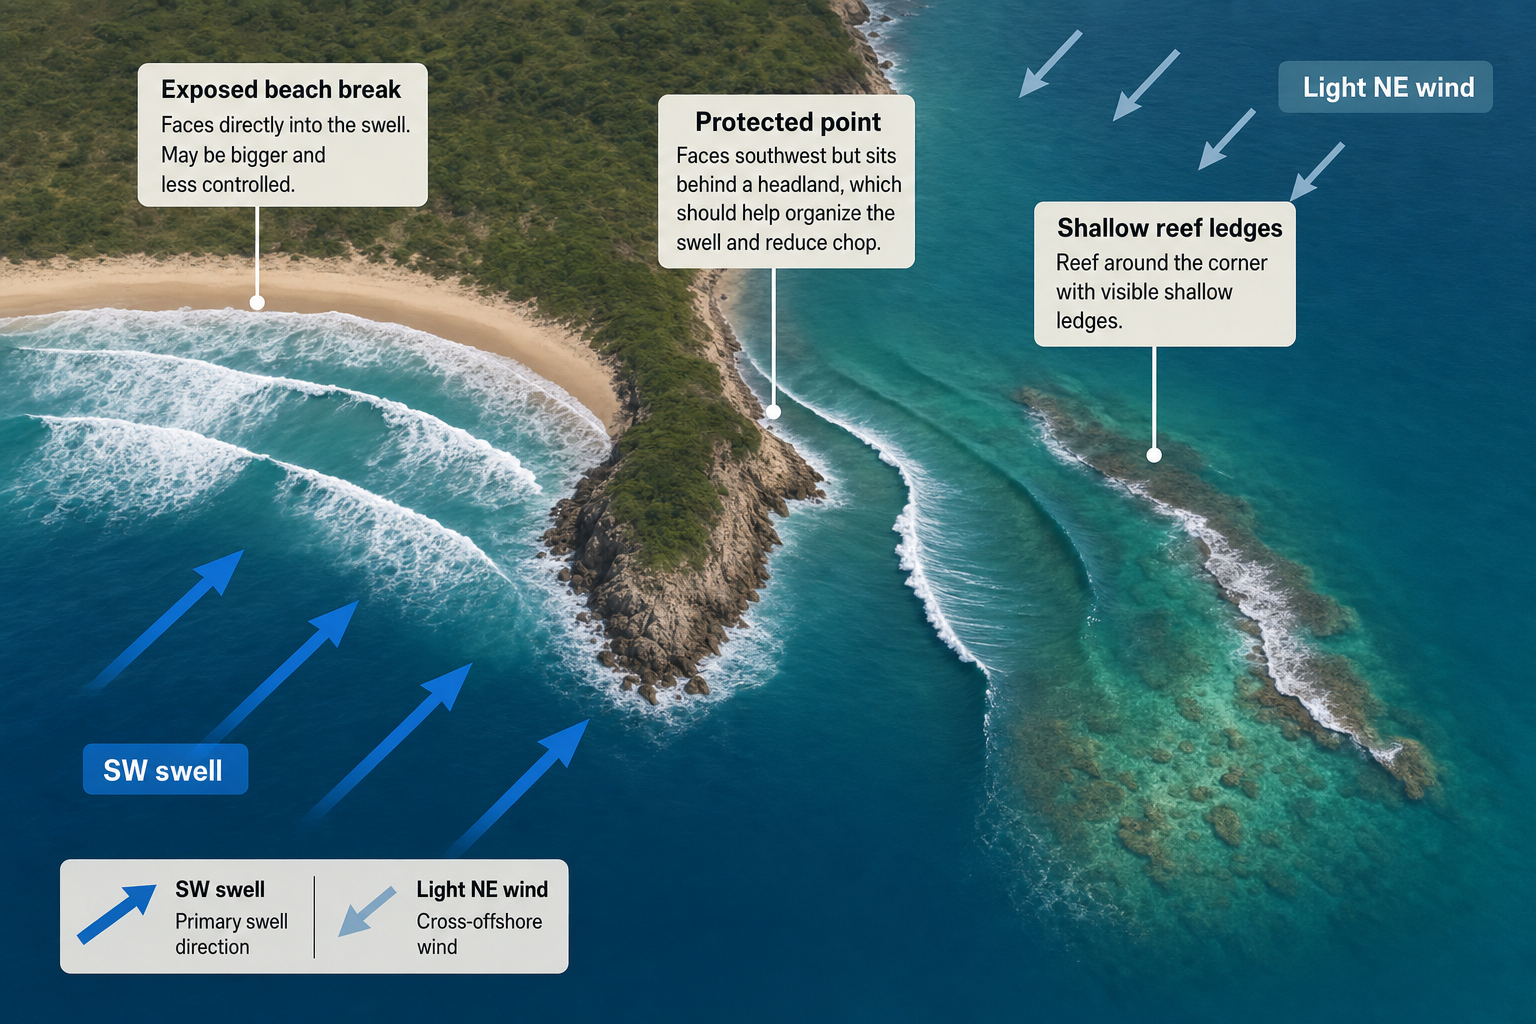
Imagine you are visiting a coastline with three options nearby: an exposed beach break, a protected point, and a reef around the corner. The forecast shows a four-foot southwest swell at fourteen seconds, light northeast wind in the morning, and a rising mid tide.
Your guidebook says the beach break can handle southwest swell but gets powerful and rippy with long-period energy. The point prefers southwest swell with northeast wind and works best from mid to high tide. The reef is suited to smaller swell and can get dangerously shallow at low tide.
You check satellite imagery. The point faces southwest but sits behind a headland, which should help organize the swell and reduce chop. The beach faces directly into the swell and may be bigger and less controlled. The reef shows visible shallow ledges and a channel beside the break.
Next, you check a nearby surf cam. The exposed beach is already solid and bumpy on the lower tide. A buoy confirms the swell has arrived with a strong fourteen-second period. Wind readings show light offshore flow, but the afternoon forecast predicts onshore conditions developing.
The smart plan is to arrive early at the point, watch it through the rising tide, and keep the beach break as a backup if the point is too crowded or too small. You bring a board with good paddle volume and leave the reef for another day when you can observe it in smaller, more forgiving conditions. That is effective surf spot research: not guessing, but making an informed, flexible call based on real data.
Common Mistakes When Researching Surf Spots
Relying on only one forecast. A single spot forecast can be wrong, especially where coastline shape is complex. Cross-reference with wind models, buoys, and cams.
Ignoring swell direction. Many surfers focus on swell height and overlook the most important detail. If the swell angle is wrong, a famous wave can sit completely flat while a less-known beach down the coast is pumping.
Forgetting about tide. Some spots only work within a narrow tide window. Arriving two hours late can mean missing the session entirely, even if the swell is solid.
Assuming nearby spots behave the same. Two breaks close together can be completely different experiences depending on headland position, reef shape, and wind exposure.
Overlooking access and etiquette. Knowing where to park and how the lineup works can matter as much as reading the forecast correctly. A smooth first visit starts well before you put on your wetsuit.
Keep Notes and Build Your Own Surf Spot Knowledge
The best surfers are often the most attentive observers. After visiting a new spot, write down what you learned: swell direction and period, tide stage, wind, board choice, crowd level, and how the wave actually behaved. Over time, your own notes become more useful than any generic forecast or guidebook entry.
A weatherproof pocket notebook is ideal for jotting notes on the beach or cliff top without worrying about spray or rain. If you prefer a dedicated format for tracking surf sessions, a structured surf log book lets you record conditions, gear, and observations in one place.
It also pays to document what you see visually. An action camera mounted on the shore or cliffside can capture how a spot breaks on different tides and swell angles, giving you reference footage that is far more informative than a written description alone. A high-capacity microSD card means you will never have to cut a scouting session short because you ran out of storage.
If you are heading to a remote spot, pack smart. A waterproof dry bag backpack keeps your gear protected on the hike in, and a portable power bank ensures your phone stays charged for maps, forecasts, and photos throughout the day. A waterproof phone pouch protects your device near the water, and a reliable orienteering compass is a useful backup when trails are unmarked and signal is limited.
Researching new surf spots is part science, part patient observation, and part local intuition built over time. Guidebooks give you background and context, maps reveal the physical layout of the coastline, surf cams show you what is actually happening, and forecasts help you choose your moment. When you combine those tools with patience in the lineup and genuine respect for the local community, you do more than find good waves — you build a deeper, lasting understanding of the ocean itself.