Barreling waves are the most iconic and sought-after waves in surfing: steep, hollow, fast-moving walls of water that throw a lip forward to create a tube. They represent the purest test of timing, positioning, and wave reading. A barrel can be playful and makeable at a sandbar, or heavy and technical over a shallow reef. Understanding how barreling waves form helps surfers know where to find them, when they’ll break well, and how to surf them with more confidence. If you’re serious about chasing tubes, picking up a copy of a surf technique book focused on natural surfing can help you build the foundational skills before you find yourself locked in one. It’s also worth having a reliable quality surfboard leash dialed in before paddling out at any hollow break.
What Creates Barreling Waves?
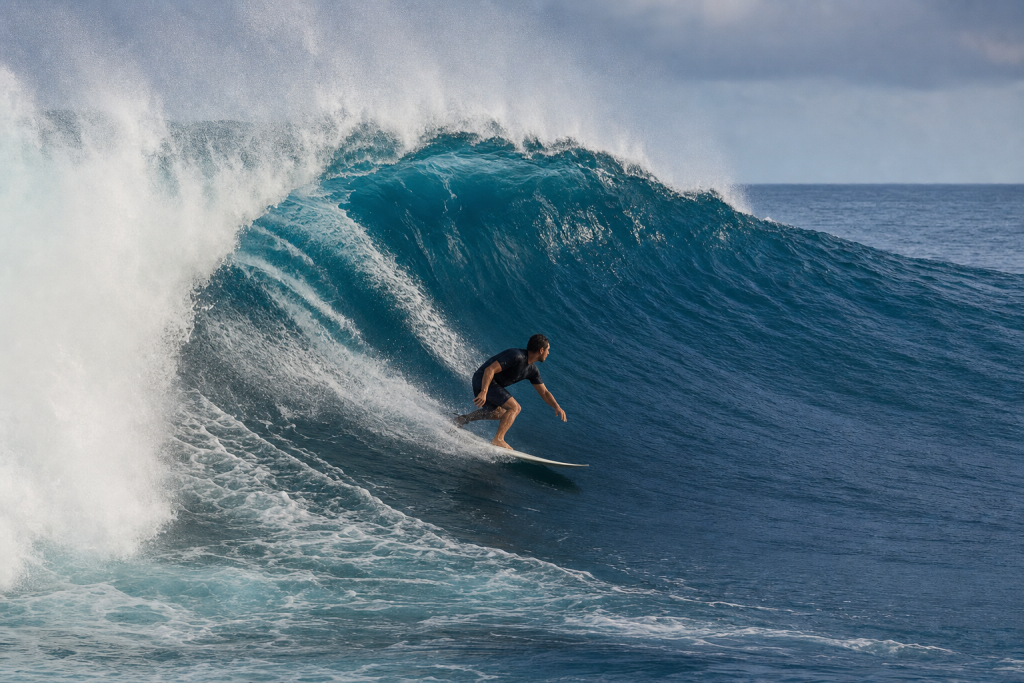
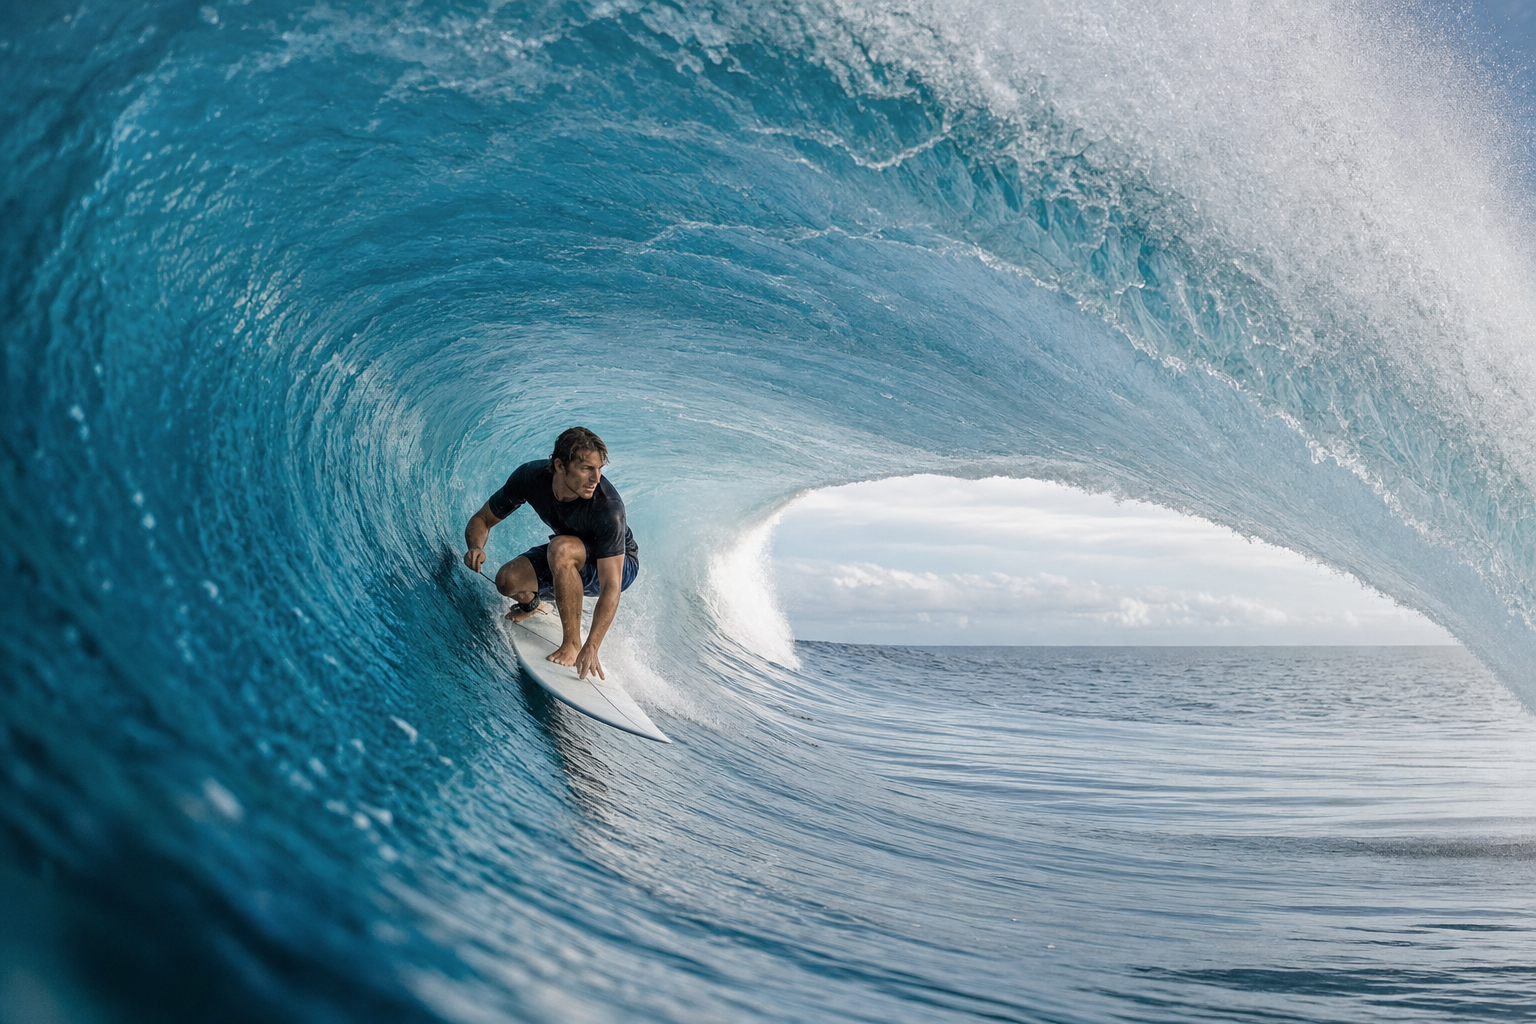
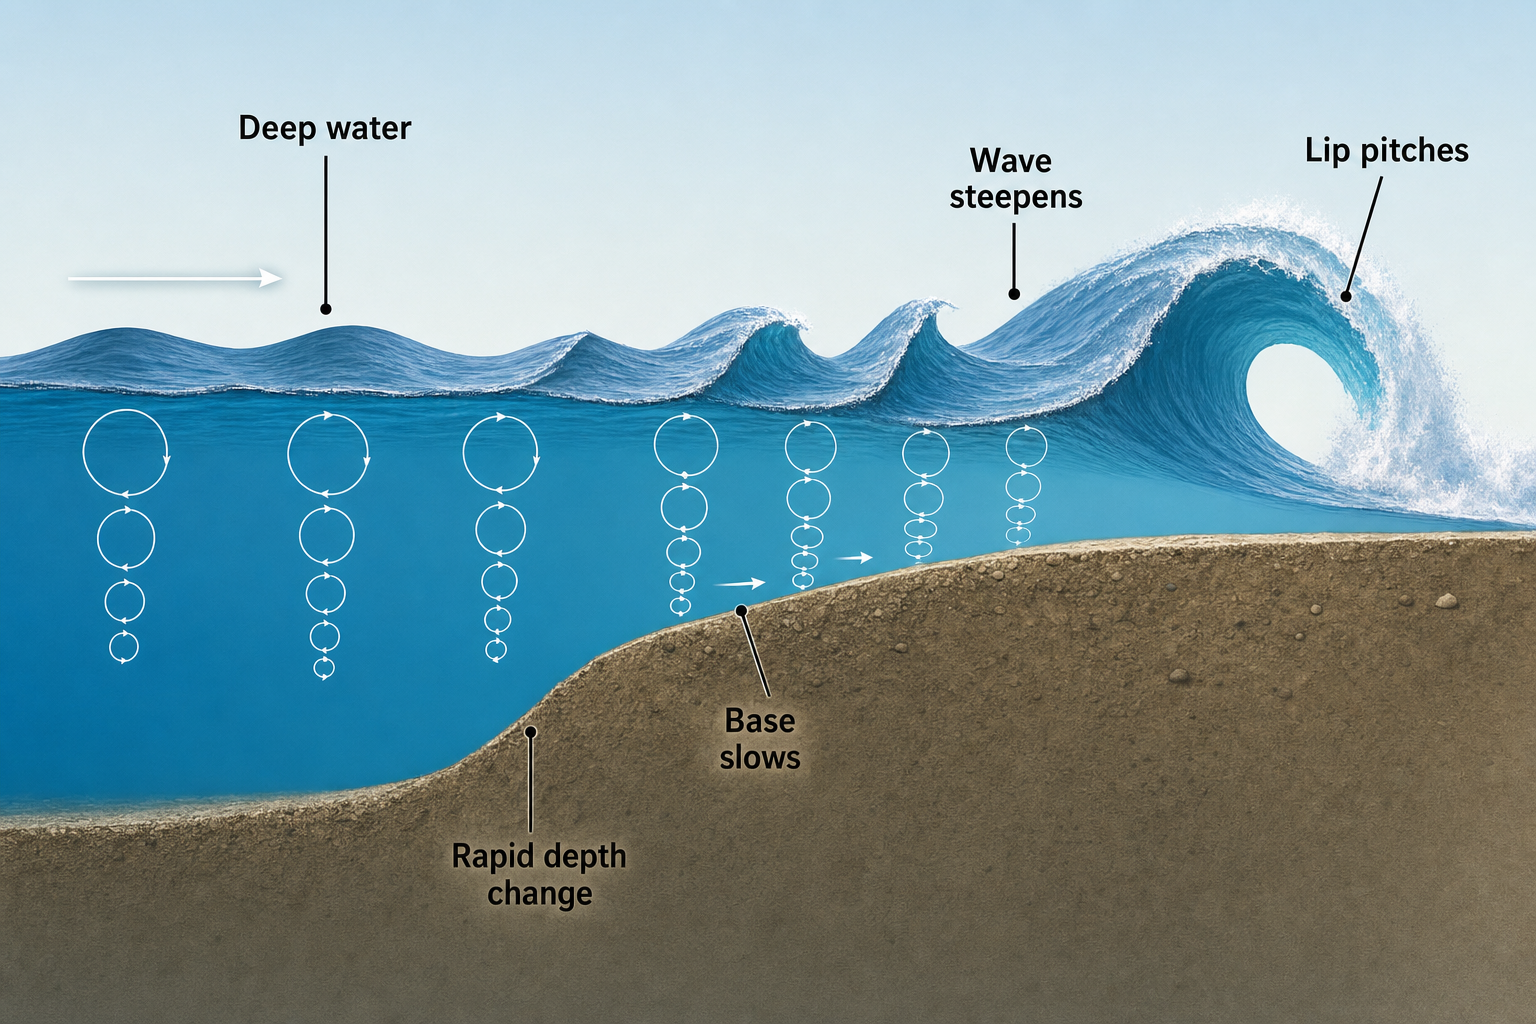
Barreling waves are a type of plunging wave. They form when the top of the wave moves faster than the lower part, causing the crest to pitch forward and land in front of the face. When that lip throws far enough outward, it creates the hollow space surfers call the barrel, tube, or pit.
The key ingredient is a rapid change in water depth. As swell travels from deep water into shallow water, the lower part of the wave slows down because it starts to feel the seabed. The upper part keeps moving, the wave steepens, and eventually the lip pitches forward. If the bottom shape is right, the wave doesn’t merely crumble — it folds over itself and becomes hollow.
Why Some Waves Barrel and Others Crumble
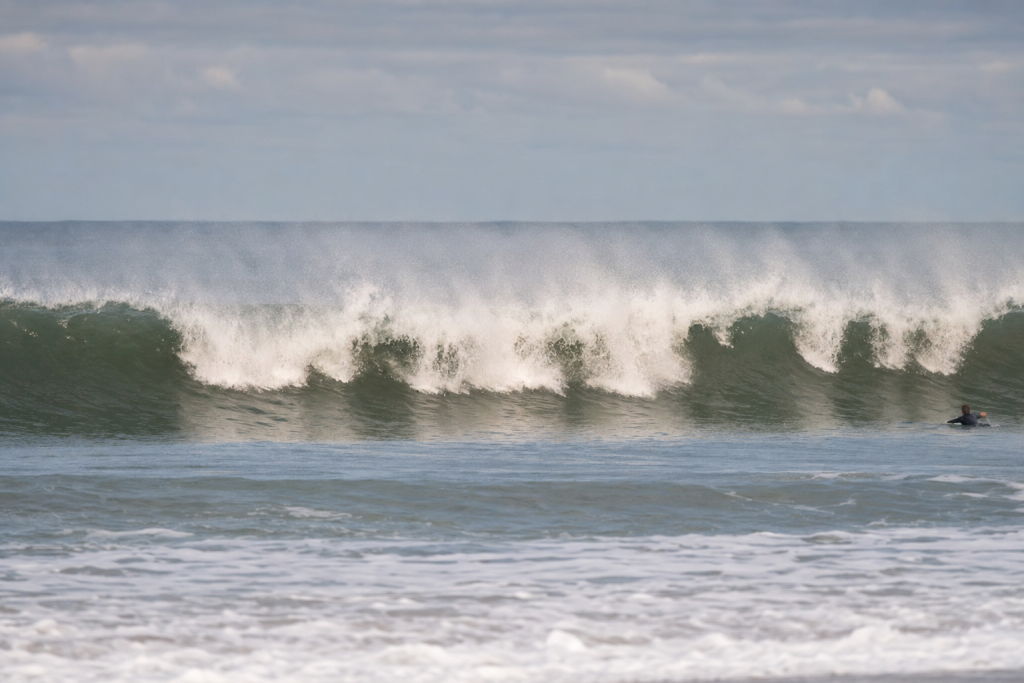
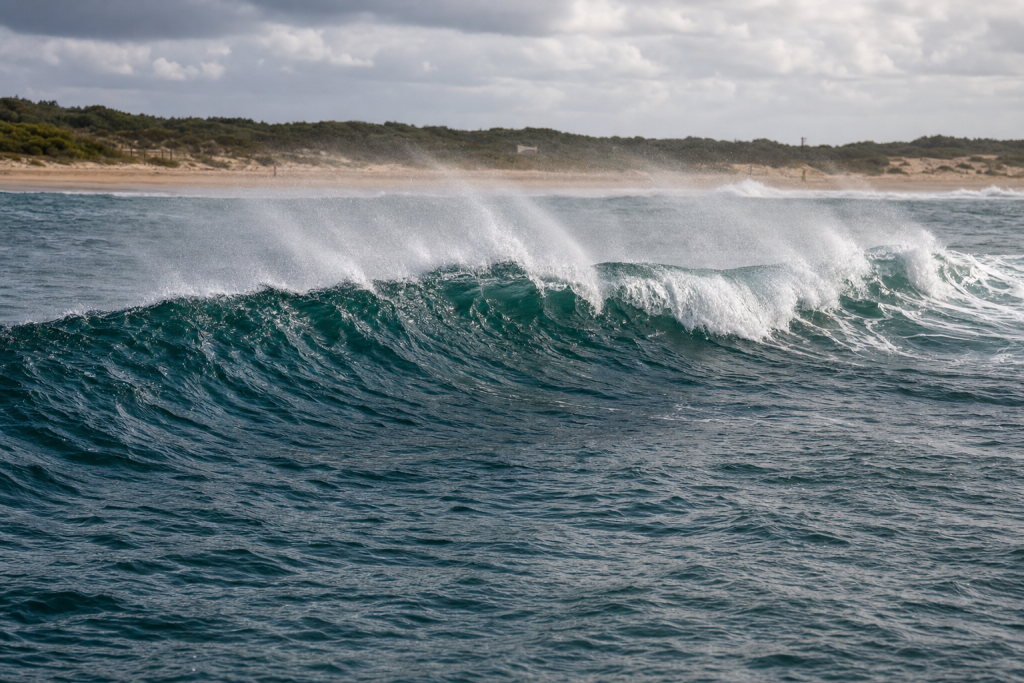
On a gently sloping seabed, waves usually break as spilling waves. The crest crumbles down the face in a softer, more gradual way. On a steeper seabed, waves are more likely to plunge. The more abrupt the transition from deep to shallow water, the more likely the wave is to go hollow.
That said, “steep” doesn’t automatically mean “good.” If the depth change is too sudden, the wave may explode, close out, or break in water too shallow to offer a clean line. The best barreling waves usually come from a balance: enough abruptness to make the lip throw, but enough shape to let the wave peel down the line.
The Role of Wave Energy
A wave needs enough energy to throw its lip forward. That energy comes from swell size, swell period, and how efficiently the swell meets the bottom. Long-period swells carry more energy and feel the seabed earlier, which is why they tend to create heavier barrels at reefs and points. Shorter-period swells can still create tubes, especially at shallow beachbreaks, but they’re usually less powerful and less organized.
How Barreling Waves Look and Feel
A barreling wave has a distinct shape. The face stands up quickly, the lip thickens, and the crest projects outward instead of spilling down the face. From the surfer’s perspective, it looks like a curved wall with a hollow pocket forming just behind the lip.
Shape, Steepness, and Hollowness
The best barreling waves have a clean, concave face and a defined throwing lip. The face is steep enough to generate speed immediately, but not so vertical that the surfer can’t set an edge. The tube itself may be round, almond-shaped, or square depending on the bottom contour and swell direction.
Hollowness describes how much empty space exists between the wave face and the falling lip. A slightly hollow wave may offer a quick cover-up. A very hollow wave may throw several feet outward, creating a deep tube with a powerful foam ball driving behind the surfer.
Power, Speed, and Height
Barreling waves are generally faster than spilling waves because they break with more force and a steeper face. The surfer must generate speed early, hold a high line when needed, and adjust quickly once inside the tube.
Height alone isn’t the deciding factor. A head-high barreling wave over a shallow reef can be far more powerful than a double-overhead wave on a softer sandbar. True power depends on swell period, bottom shape, and how much water is moving over the ledge.
In general, barreling waves are:
- Steep, with a fast-rising face.
- Hollow, with a lip that throws outward.
- Fast, often requiring immediate down-the-line speed.
- Powerful, especially over reefs and shallow sandbars.
- Technical, because small mistakes in timing carry real consequences.
How Hard Are Barreling Waves to Surf?
Barreling waves are generally harder to surf than soft, spilling waves. They demand sharper positioning, quicker pop-ups, stronger rail control, and better judgment. A beginner can get a feel for small tubes on a forgiving sandbar, but truly hollow waves are best suited to intermediate and advanced surfers.
Why Barrels Are Challenging
The difficulty comes down to three things: speed, steepness, and timing. The takeoff is often late because the wave stands up quickly. The surfer must paddle in before it pitches, pop up fast, and set a line before the lip lands.
Once inside the barrel, there’s little room to correct. Too high and you get clipped by the lip. Too low and the foam ball catches you. Stall too much and the wave overtakes you. Race too far ahead and you outrun the tube entirely.
Different Levels of Barreling Waves
Not all barrels are equal. A small, clean beachbreak tube might be approachable for a confident intermediate surfer. A thick reef slab with a near-vertical drop is a completely different challenge. The easiest barrels tend to be small, predictable, and sand-bottomed. The hardest are shallow, powerful, and fast. A good progression is to start with waves that are only slightly hollow, then work toward faster and deeper tubes as your timing improves.
Gear That Matters for Barreling Waves
Before getting into the mechanics of how barrels form and where to find them, it’s worth talking about what you’ll need when you paddle out. At hollow, powerful breaks, your gear choices matter more than at softer waves.
A good pair of fins makes a real difference in how your board holds and responds in a steep barrel. FCS II tri fins designed for speed and control are a solid option for surfers who want adaptability across different hollow conditions. If you’re running a Futures setup, honeycomb fiberglass performance fins compatible with Futures boxes are worth looking at for similar performance benefits.
Grip is critical when you’re trying to make split-second adjustments in a fast tube. A three-piece EVA surfboard traction pad with a kick gives your back foot something solid to work with. And don’t underestimate your wax — a cool-water surf wax builds good bumps and holds up in colder conditions.
If you’re surfing reef breaks, protecting yourself is worth thinking about. Reef booties add a layer of protection against coral and rock if you wipe out in shallow water. A low-profile surf helmet is smart at heavier breaks, and an impact vest can soften the blow when the ocean throws you onto the bottom. For cold-water reef breaks, a well-fitting 3/2mm full wetsuit keeps you comfortable during long sessions. In warmer conditions, a UPF 50+ rash guard protects your skin during extended time in the water.
Barrels also look incredible on camera. Mounting an action camera to your board or helmet is one of the best ways to review your tube riding and spot what you need to improve. Make sure you have a high-capacity microSD card so you don’t miss any of the session. Finally, powerful waves ding boards — keep a surfboard ding repair kit in your bag so small cracks don’t turn into bigger problems.
Ideal Bottom Structure for Barreling Waves
The seabed is one of the biggest factors in whether a wave barrels. Swell may travel thousands of miles, but the final shape of the wave is decided by the bottom it crosses just before breaking.
Reefs and Ledges
Reef breaks are famous for barrels because coral, lava, and rock ledges create abrupt depth changes. A classic reef barrel forms when swell moves from deep water onto a shallow platform, jacks up suddenly, and peels along the reef as the lip throws forward.
The best reef barrels usually have a defined takeoff zone, a consistent ledge, and a channel or deeper section nearby. The reef doesn’t need to be perfectly flat. In fact, small contours can focus swell energy and sharpen the tube section.
Sandbars and Beachbreaks
Beachbreak barrels form over sandbars. These are less permanent than reefs because sand moves with storms, currents, and seasonal swell patterns. When the banks line up well, beachbreaks can produce excellent barrels with a more forgiving bottom than reef breaks.
A-frame sandbars are especially good for tubes. The wave peaks in one spot and peels both left and right. Long, straight sandbars can also create barrels, but they often close out if the swell direction is too direct.
Points, Rivermouths, and Slabs
Pointbreak barrels form when swell wraps around a headland and breaks along a rock, reef, or sand bottom. These waves can produce long, fast tubes when the swell angle matches the point’s contour. Rivermouths can create high-quality sand-bottom barrels because river flow carves deep channels and shapes shallow banks. Slabs are a more extreme version of a reef break, where deep water meets a very shallow shelf. They’re often thick, square, and unforgiving.
Seabed Gradient and Why It Matters
Seabed gradient refers to how quickly the bottom rises toward shore. A gradual gradient usually produces softer waves. A steeper gradient increases the chance of a plunging, hollow break.
As a general rule, waves tend to break when their height reaches roughly 70 to 80 percent of the water depth, though reefs and complex bottoms vary widely. When that depth change happens quickly, the wave has less time to spill and more tendency to pitch forward.
The Best Gradient for Barrels
The ideal barrel-making gradient depends on the type of break:
- Beachbreaks often need a shallow bank with a defined trough in front of it.
- Reefs often need deep water sitting next to a shallow ledge.
- Points need a bottom contour that lets the wave peel rather than collapse all at once.
If the gradient is too gentle, the wave may be fat and weak. If it’s too steep, the wave may pitch too hard to make. The best barrels sit between those two extremes.
How Swell Direction Affects Barreling Waves
Swell direction determines how the wave approaches the bottom. This is critical because a barreling wave must not only throw — it must peel. A wave that breaks all at once may be hollow, but it won’t offer a rideable line.
The Best Swell Angle for Barrels
The best swell angle is usually slightly oblique to the reef, sandbar, or point. If the swell hits too straight-on, the wave may close out. If it arrives too sideways, it may race past the best part of the bottom or break weakly.
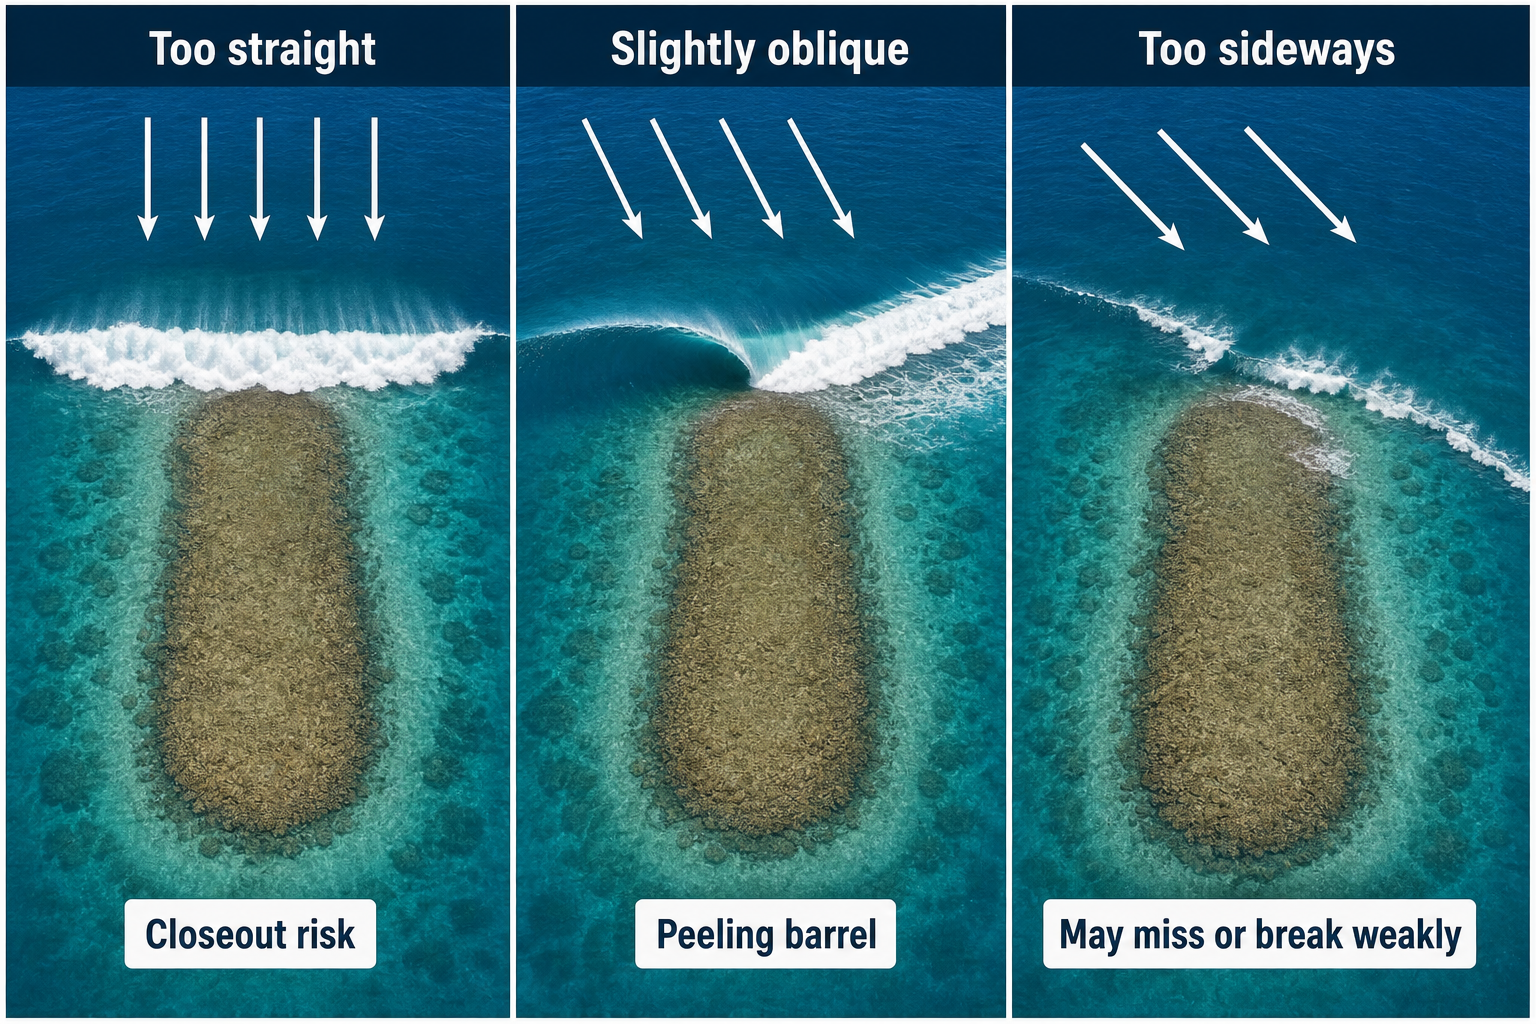
For many barreling waves, the ideal angle creates a diagonal peeling line across the bottom. On some breaks, that might mean a swell arriving 20 to 45 degrees off the main contour. On reef passes and points, the effective window can be much narrower.
Swell Direction and Refraction
Long-period swells bend, or refract, as they enter shallower water. This can focus energy onto a reef or wrap swell into a pointbreak. Refraction is why a spot may barrel on a swell that looks slightly off-angle on a map — and why two nearby breaks can behave completely differently on the same swell. Good barrel hunters learn how swell lines bend around headlands, concentrate over underwater canyons, and unload on shallow ledges.
How Swell Period Affects Barreling Waves
Swell period is the time between passing wave crests. It’s one of the most important factors in barrel quality because it affects wave speed, power, and how the swell interacts with the seabed.
Short-Period Swell
Short-period swell, generally under 10 seconds, is usually generated by nearby wind. It can create fun, punchy barrels at beachbreaks when the sandbars are shallow and the wind is light. These waves are typically less powerful and less organized than longer-period swell.
Medium-Period Swell
Medium-period swell, roughly 10 to 14 seconds, is often ideal for sandbars, points, and moderate reefs. It has enough organization to create clean lines without being so powerful that it overwhelms a break.
Long-Period Swell
Long-period swell, around 15 seconds and above, carries significantly more energy and can create serious barrels at reefs, slabs, and deep-water points. It feels the bottom earlier and can draw more water off a ledge before the lip throws, which often makes the wave thicker and more powerful.
Longer isn’t always better, though. At some beachbreaks, a very long-period swell closes out because the wave lines are too strong and straight. At some reefs, it may break wider than expected or concentrate too much energy on the takeoff zone.
Best Wave Height, Tide, and Wind for Barreling Waves
There’s no single perfect combination of height, tide, and wind for every barreling wave. Each break has its own window. That said, certain patterns hold across most spots.
Best Wave Height for Barreling Waves
Many waves begin to barrel once they have enough size to stand up over the shallow section of the bottom. For some beachbreaks, that can happen at waist to head height. For deeper reefs and points, the wave may need to be overhead before it goes truly hollow.
The best size is whatever activates the bottom without overwhelming it. Too small and the wave may be weak or sectiony. Too big and it may close out, wash through, or break beyond the ideal ledge.
Best Tide for Barreling Waves
Barrels often improve on lower tides because less water over the bottom makes the wave steeper and hollower. Many reef and beachbreak barrels work best from low to mid tide. But this varies considerably by break. Some shallow reefs need more water to be rideable at all. Some sandbars become dangerously shallow at dead low. Some points barrel best on a dropping tide because the wave stands up over the bank while still having enough depth to run.
Rather than assuming low tide is always best, watch how the wave changes through the tidal cycle. The best barrel window may only last an hour or two.
Best Wind for Barreling Waves
Light offshore wind is the classic barrel condition. It holds the face open, delays the lip slightly, and keeps the tube clean. Cross-offshore wind can also be excellent, especially if it blows into the barrel and smooths out the face.
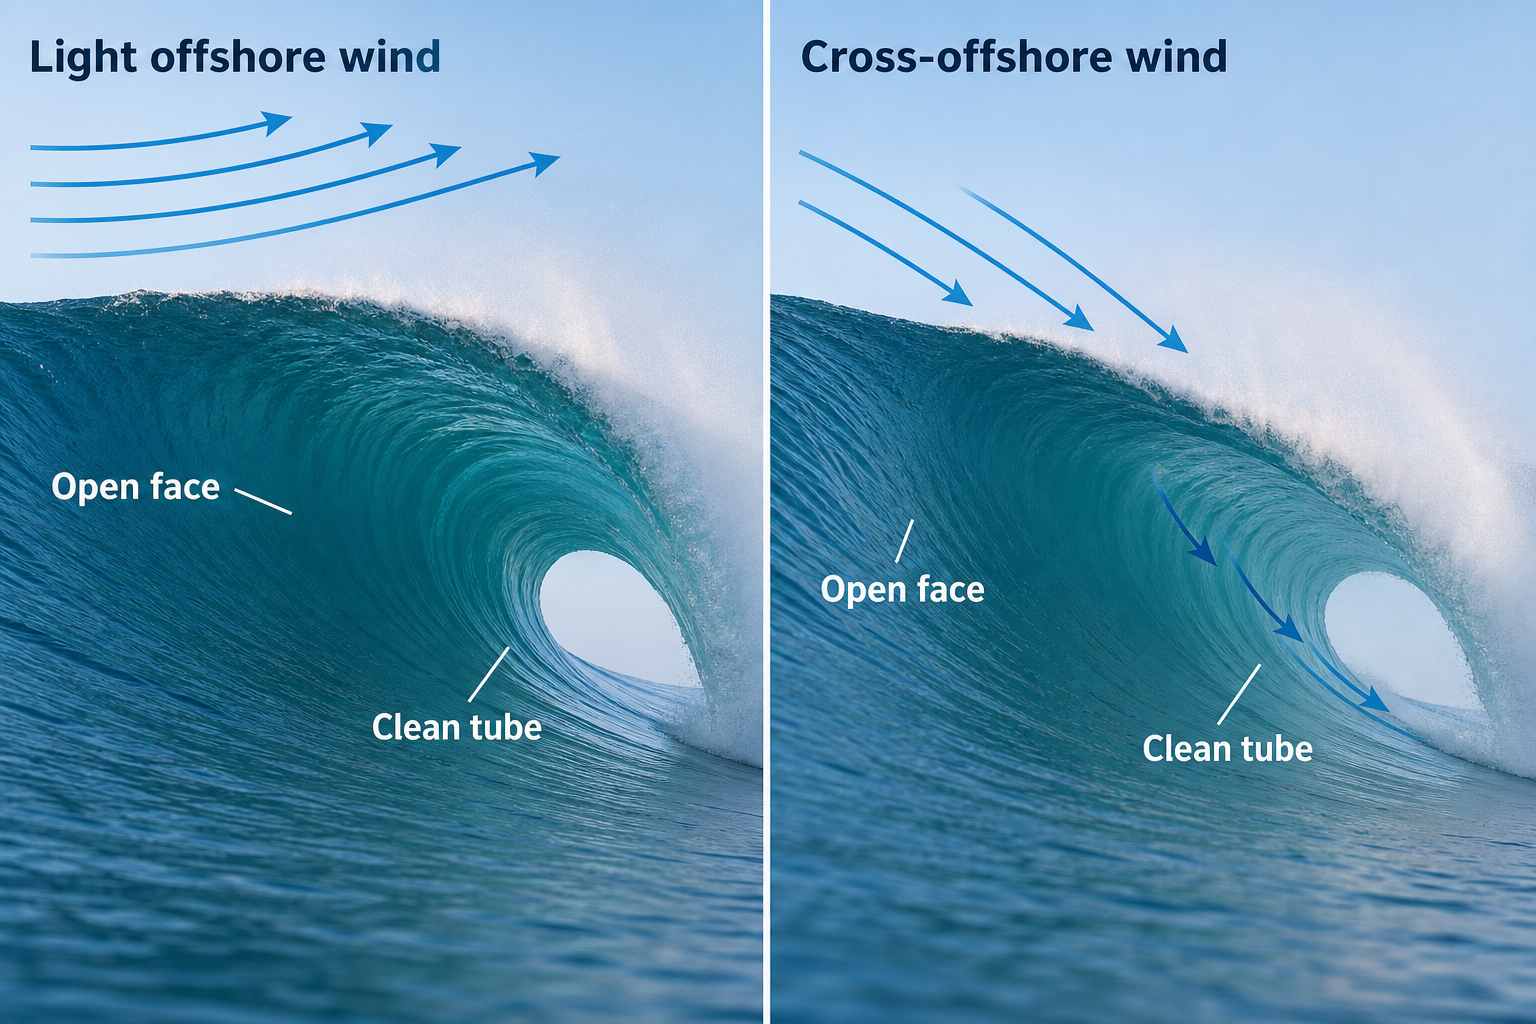
Too much offshore can make takeoffs difficult because it pushes up the face and holds surfers back. Onshore wind usually causes the lip to crumble, though very light onshore can occasionally help surfers get into waves that are otherwise too ledgy to paddle into.
How to Recognize Rideable Barreling Waves
A hollow wave is not automatically a good wave. Some barrels are makeable, while others are closeouts. The difference is whether the wave offers a line that a surfer can actually follow.
Signs of a Makeable Barrel
A rideable barreling wave usually has a shoulder. The lip throws over, but the breaking section moves down the line rather than detonating all at once. From the beach, look for a diagonal peel, an open exit, and surfers coming out clean before the section shuts down.
Good signs include:
- A clear peeling direction — left or right.
- An almond-shaped opening rather than a flat, straight wall.
- A face that gives the surfer time to set a rail before the lip lands.
- A visible exit further down the line.
Signs of an Unmakeable Barrel
An unmakeable barrel often looks spectacular from the beach but offers no real exit. The wave may break in a straight line across the sandbar, or the lip may land too far out in front of the face. Warning signs include no shoulder or peeling direction, a long straight closeout, a lip that lands well beyond the base of the wave, and a foam ball that overtakes every surfer who tries.
One of the best ways to read barrel quality is to watch several sets before paddling out. Note where the wave first breaks, how fast it runs, and where successful surfers take off. The makeable wave is often not the biggest one in the set — it’s the one with the best angle.
How to Surf Barreling Waves
Surfing barrels is about being in the right place early, setting the right line, and making small adjustments at speed. The goal isn’t just to stand inside the tube — it’s to stay in the part of the wave where the barrel is open and moving.
Positioning for Barreling Waves
Most barrel rides are decided before the surfer stands up. You need to sit deep enough to be behind the lip, but not so deep that the wave runs away without you. On a peaky wave, position near the takeoff zone where the wave first throws. On a point or reef, line up with a landmark and adjust based on set size.
Paddle with commitment and angle slightly down the line. A straight takeoff may work on softer waves, but barrels tend to reward a diagonal entry. This means you’re already moving toward the exit before you even stand up.
The Takeoff and Bottom Turn
The takeoff on a barreling wave is often steep. Keep your chest low while paddling, pop up quickly, and get your front foot planted with control. Hesitation is the enemy — the lip is already pitching.
On some barrels, especially fast reef waves, there’s no time for a full bottom turn. You may need to knife in, set the rail high, and immediately trim. On other waves, a compact bottom turn puts you in the pocket and sets the line under the lip.
Finding the Right Line in the Tube
Inside the barrel, your line depends on the wave’s speed. If the wave is fast, stay high and drive forward. If it slows or opens up, drop your line and stall slightly. Keep your eyes focused toward the exit, not at the lip above you.
Frontside tube riding often uses subtle hand drags and shoulder rotation to control speed. Backside tube riding typically calls for a more compressed stance, sometimes with a rail grab — a technique known as pig-dogging — to stay low and locked into the face.
Speed Control Inside the Barrel
Barrel riding is a constant balance between stalling and accelerating. To slow down, compress your body, drag your trailing hand, or shift weight slightly toward the tail. To speed up, release the stall, drive high, and pump lightly through the upper part of the face.
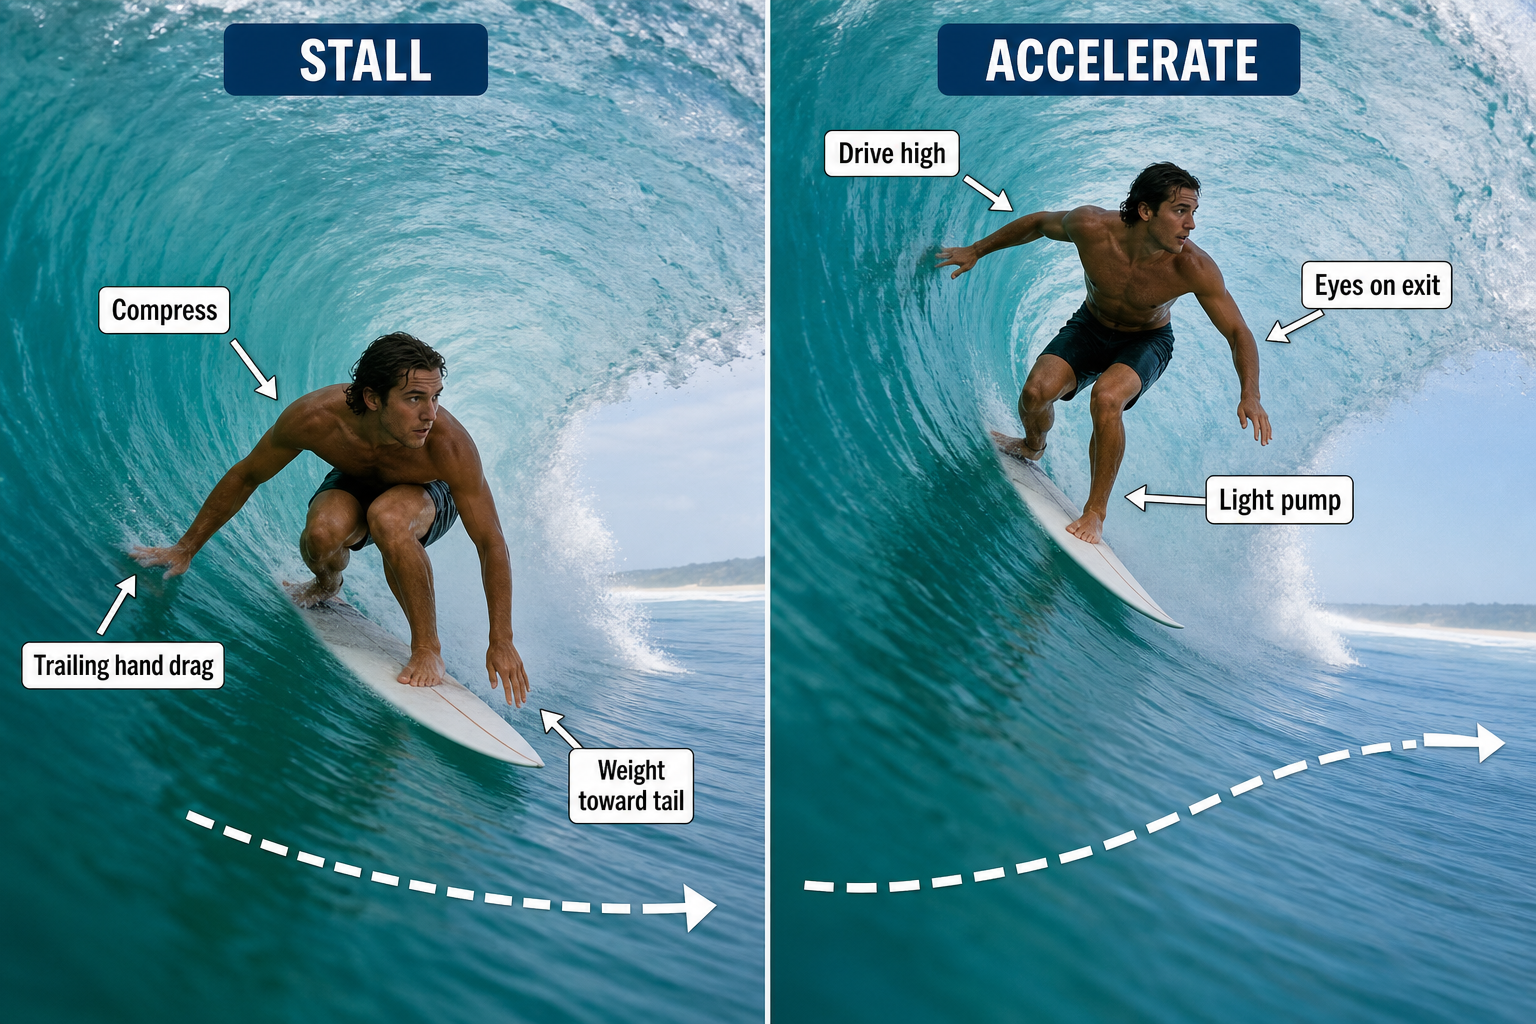
Good tube riders rarely make big movements inside the barrel. They use compact adjustments because there’s limited space and very little time. The smoother the movement, the better your chances of staying in rhythm with the wave.
Exiting the Barrel
The cleanest exit is through the open shoulder as the barrel widens. If the section is pinching, surfers may aim for the doggy door — the small gap near the base of the lip just before it closes. Sometimes the best exit is high on the face, using speed to punch through the curtain before it collapses.
A successful exit almost always comes from anticipation. If you wait until the tube is already shutting, it’s usually too late. Watch the shape ahead and adjust before the section changes.
Board Choice for Barreling Waves
The right board depends on the size and power of the barrel. In small beachbreak tubes, a shortboard with responsiveness and speed usually works best. In larger or heavier surf, surfers often move to a step-up with more length, refined rails, and added hold through steep drops.
A good barrel board generally has enough rocker to fit into steep drops, rails that hold at speed, and enough paddle volume to enter the wave early without being bulky. Too much volume makes it hard to set rail on a hollow face. Too little makes it difficult to catch the wave before it pitches.
Other Factors That Make Barreling Waves Better
Clean Swell Lines
Organized swell creates better barrels than messy, crossed swell. When multiple swell directions interact, the face becomes lumpy and unpredictable. Clean swell lines allow the wave to draw evenly over the bottom and produce a more consistent tube.
Local Currents
Currents can improve or ruin barrels. A current running along a sandbar may help shape a peeling wave. A rip beside a peak may deepen the takeoff channel and sharpen the bank. Strong cross-currents, however, add chop to the face and make positioning much harder.
Sand Movement and Seasonal Change
At beachbreaks, the best barrel conditions often depend on recent sand movement. Storms can destroy a sandbar, but they can also build a new one in a better position. Long calm spells may gradually smooth a bank into a better shape. This is why a beachbreak can be world-class one month and completely ordinary the next.
Famous Surf Spots with Barreling Waves
Many of the world’s most celebrated waves are known specifically for their barrels. Each has a different combination of swell window, bottom shape, and local character.
- Pipeline, Hawaii: A legendary reef barrel with multiple ledges and a powerful, top-to-bottom lip. Considered by many to be the most famous wave in the world.
- Teahupo’o, Tahiti: A heavy reef pass known for extraordinarily thick barrels that break over very shallow coral.
- Cloudbreak, Fiji: A long reef break that can produce fast, open barrels on strong South Pacific swells.
- Desert Point, Indonesia: A long left-hand point and reef setup capable of extended tube sections on the right swell.
- Padang Padang, Indonesia: A compact, hollow left reef barrel that needs solid swell to come to life.
- Skeleton Bay, Namibia: A sand-bottom left famous for extremely long, fast barrels running along a desert point.
- Supertubos, Portugal: A beachbreak known for powerful, heavy peaks and serious sand-bottom tubes.
- Kirra, Australia: A right-hand sand-bottom pointbreak capable of long, high-speed barrels when the banks align.
- Mundaka, Spain: A rivermouth left that barrels across a sandbar when the swell direction and tide come together.
- Puerto Escondido, Mexico: A powerful beachbreak often called the Mexican Pipeline for its heavy, thick-lipped barrels.
- The Box, Western Australia: A short, intense slab with a square, technical barrel that breaks in very shallow water.
- La Gravière, France: A Hossegor beachbreak famous for thick, shifting sandbar tubes that rival reef breaks in intensity.
None of these waves barrel every day. Even the most consistent barrel spots need the right swell direction, period, tide, and wind to line up. That’s exactly what makes scoring a great one so rewarding.
Barreling waves are created when swell energy meets a bottom shape that forces the wave to steepen and pitch forward. The best ones combine hollowness with a clean peeling line, giving the surfer both a tube and an exit. Reefs, sandbars, points, slabs, and rivermouths can all produce barrels, but each works within its own specific range of conditions. Learning to surf them starts with learning to read them — look for angle, shoulder, speed, and exit. Start with smaller, cleaner tubes before moving into heavier surf. With better timing, sharper positioning, and the right gear for the conditions, barreling waves become less intimidating and far more rewarding to surf.